
Welcome to Part 16 of The Wild Beyond the Witchlight: Reimagined, an expansion and alternative take on the The Wild Beyond the Witchlight campaign.
Please check out the previous entries in the series before diving in here.
- Introduction and Table of Contents
- Part 0: Adventure Outline
- Part I: Preparation
- Part II: Lost Things
- Part III: Interlude
- Part IVA: The Witchlight Carnival (Section A)
- Part IVB: The Witchlight Carnival (Section B)
- Part V: Murkendraw (Welcome to the Swamp)
- Part VI: Murkendraw (Locations of the Swamp)
- Part VII: Murkendraw (Downfall and Bavlorna)
- Part VIII: The Fields of Spring (aka Thither)
- Part IX: The Fields of Spring (Vale Crossing – Section A)
- Part X: The Fields of Spring (Vale Crossing – Section B)
- Part XI: The Fields of Spring (The Shroudwood)
- Part XII: The Fields of Spring (Loomlurch)
- Part XIII: The Fields of Spring (The Golden Fields)
- Part XIV: The Fields of Spring (The Green Keep)
- Part XV: Yon
If you want to be notified every time I release a new entry in this series, feel free to follow me on reddit and / or sign up for my e-mail newsletter!
Introduction
Greetings travelers of the frigid expanse of Yon! When we last left off, the party had made their way up into the Shimmerstorm Mountains and taken a rest for the evening.
Today we will cover the party’s continued journey through the mountains as they meet the korreds of Lockbury Henge, descend into a new location known as The Howling Mines, and finally encounter the small but industrious brigganocks. As a reminder from last time, we are skipping the Fey Beacons location as I am breaking up that content into parts elsewhere. Let’s dive in!
Lockbury Henge

Lockbury Henge is a great time to level up your players to Level 7, though I leave it to you whether this is when they first arrive at the megaliths or once they say their goodbyes to the korreds.
We’ll be running this area a bit differently as we can make this area more of a hub for select events:
- The initial mystery of the campfire and standing stones will remain the same. Instead of an Insight check to solve the gameboard though, I flashed up a game of chess where there was only one move left to win (these are common puzzles you can find online known as “checkmates in one”). That part is entirely optional though.
- I also felt it was a bit too easy to get into combat with the korreds, which I wanted to avoid, so consider making their threshold for attacking the party higher than the book describes
- Once Queen Argantle emerges and befriends the party, instead of having everything take place at the standing stones, I had her invite and lead the group back a short distance to the nearby korred settlement to talk (see below), as well as serve as the location where the Distant Racket and Korred Dance events play out
The Korred Village
Read the following as Argantle and the group arrive:
As you follow Queen Argantle, you soon find yourself standing in front of a small village of sorts nestled into the side of a mountain. The homes here are made of stone, each with a beautifully decorated roof made of intricately designed tiles. It’s clear that a lot of care and attention has gone into their creation. There are dozens of Korreds, each with their signature wild black hair, milling about and glancing in your direction.
Queen Argantle will leads the party into one of the dwellings, the interior of which is simple, with the furniture all crafted from stone. She will invite the party to sit and shares the information from the book that she would typically give at Lockbury Henge itself.
As the discussion continues, at this point the “Distant Racket” event should play out as Argantle heads outside to investigate and subsequently also shares the info listed there as well as the additional pieces below:
- Given the feud with the brigganocks, Argantle would be very grateful if the party could drive off the creatures. They live deep in The Howling Mines, which is where the party would need to go next anyway if they are seeking to head towards the Winter Palace.
- She notes that the while the mines hold very valuable gems, the korreds steer clear due to the creatures that call it home (as well as the brigganocks of course)
- Past The Howling Mines is Motherhorn, the home of Bitter End, and also on the way to the palace. If they are indeed heading in that direction then she encourages them to speak with Gleam who is also staying here in the village. She will point to a slender figure wearing a crescent moon mask standing on an outcrop of rock
- Note: As a reminder we purposefully removed Gleam from the intro to Yon and moved her here!
- She offers the hospitality of the village to the group, noting they are free to stay the night as well as explore if they desire.

Gleam
If the players seek out the high elf acrobat, she will beseech them for help. They may notice though that she’s missing her shadow…
Gleam will share the following:
- Endelyn Moongrave, who the korreds call Bitter End, snipped off Gleam’s shadow using a pair of magic scissors and has imprisoned her twin sister, Glister, at Motherhorn.
- The twins worked as an acrobatic duo, and they used to be star performers in the Witchlight Carnival. Gleam wants to free her sister and find a way back to the carnival, but has been waiting here struggling to come up with a plan to do so
- If the players offer to help she can share some helpful information
- Endelyn looks into the future. She believes from her visions that her own demise will occur during an eclipse.
- Since the Selenelion twins are the living embodiment of the moon and the sun, the hag decided to separate the elf sisters, releasing one while keeping the other as her “guest.” By keeping the twins apart, the hag hopes to forestall her doom.
- Hurly, a bugbear, made a bargain with Endelyn and is quite unhappy with how things played out. Now he is forced to perform in her morbid theater. Like Gleam, Hurly used to work for Mister Witch and Mister Light, though Gleam and her sibling had already left the carnival by the time Hurly and his brother Burly arrived.
- At your discretion you may have Gleam offer to join them as a guide to Motherhorn. She will explain that if the party is intending to get to the palace, the only way is through Motherhorn
- Endelyn looks into the future. She believes from her visions that her own demise will occur during an eclipse.
Things To Do
While in the village, the party should find that while they’re not merchants per say, the korreds do have some of their craftwork available for sale (1 of each):
- Sending Stones (Dungeon Master’s Guide): 100 gp
- Stone of Good Luck (Basic Rules): 500 gp
- Potion of Stone Giant Strength (Basic Rules): 500 gp
Additionally, I placed the “Goblin Procession” random event here as well when the group was walking through the town. You’ll notice the goblins raise a korred spirit, so it seemed like a good fit and I simply changed the Dead Ringers from being goblins to korreds.
While I chose not to use it at all, this could also be a good place for the Evil Kite event (but again swapping out the goblins for korreds).
Staying the Night
If the characters take a long rest in town I recommend having this event play out. It’s an alternative take on an idea from Korred Clans by Dan Kahn. On that note, if you’re looking to expand this area even further, Dan’s supplement dives into all of the different clans.
During the evening the players should hear the shuffling of multiple pairs of hooves outside. This is a group of young korreds, one of a which with a shaved head, trying poorly to sneak outside. If the party confronts them they will explain that:
- The korred with shaved head is Yaja, and the unofficial leader of the group. Yaja’s head was shaved as a punishment by Bitter End for the korreds non-compliance in collecting hair for the hag
- They unsurprisingly are very angry with Endelyn and want to erect a giant stone statue in the village square mocking the hag, while also reminding the clans about their honor and passion
- If the party agrees to help then it’s a three step process. As long as two or more of the steps are a success then the group creates an inspiring piece of art. For each step either call for a check (DC of 15) to determine if they are successful or just let the players get creative and award a success that way
- 1) Design it!: A player can help or take the lead on designing the statue. This could be a Charisma check
- 2) Build it!: A player can help or take the lead on the actual carving of the statue. This could be a Dexterity check using a relevant tool proficiency
- 3) With pizazz!: A player can put those important finishing touches on the statue to truly strike deep into the hearts of those who look upon it. This could be the use of an item or spell or even a Performance check
- In the morning when the village wakes and sees the statue, if the build was a success, they will be taken with it and inspired. At this point I would recommend playing out the “Korred Dance” event from the book, and perhaps awarding inspiration to the party!

The Howling Mines
Once the party is ready to depart, Queen Argantle and/or Gleam and guide the group to the nearby entrance down into the interior of the mountains to The Howling Mines and the next step on their journey.

When the group enters read the following:
As you step into The Howling Mines, the first thing you notice is a low, mournful wail that seems to echo from everywhere and nowhere at once. The rocky walls are lined with massive, shimmering stones that glow with an inner light that fills the cavern with a soft, otherworldly radiance of blues and purples.
The path ahead is wide and well-defined, presumably the handiwork of the miners that once worked here. It winds through the caverns and tunnels in a series of switchbacks and gradual inclines with sturdy wooden beams acting as supports for the earth overhead.
The walls inside the mines are made of solid rock and are on average 30 feet tall. An examination of the walls reveals a cluster of 1d3 leaves of moonwort, a silver-leaved herb that when consumed makes the user become partially incorporeal for 1 hour. While partially incorporeal, the creature has resistance to bludgeoning, piercing, and slashing damage.
Once inside there is a single winding path for the players to follow deeper into the mines.
A Treacherous Path
After a short while of the party walking deeper inside and marveling at the interior read the following:
The path ahead of you narrows, the walls now tightly closed in from both sides while icicles hang down from the ceiling to almost the floor like a maze of sharp teeth. The icicles glisten in the light of the mines, and look brittle enough to shatter at the slightest touch.
Whereas the mines have been spacious so far, there is only this narrow 10 ft high corridor ahead. With a successful DC 14 Perception check a player can discern this narrowing is temporary, and the passage opens back up soon after. With a 20 or higher, they will hear what sounds like movement beyond the passage as well.
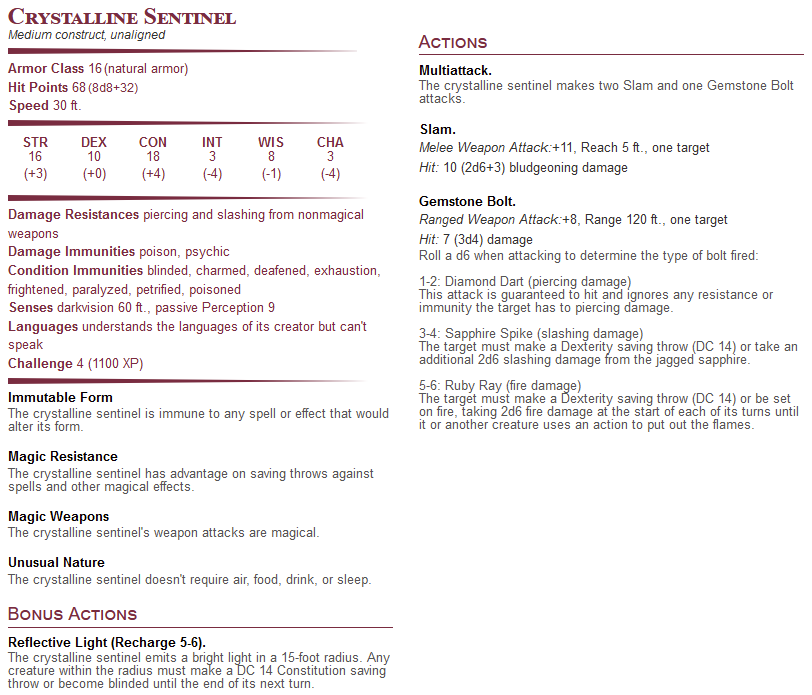
While the icicles hanging down the path ahead are a barrier of sorts, they can potentially be avoided. Any character who makes a successful DC 15 Acrobatics or Stealth check can weave through icicles or duck down and make it out to the other side without breaking any. On a failure, a character knocks into a set of icicles causing them to break off and crash to the ground. This will alert crystalline sentinels and lookouts ahead in the next room to the party’s presence, causing them to immediately attack once the players come out the other side.
Once through the obstacle, the players will be be brought into a path continuing deeper into the mines. I used this map by FairyTale Maps to represent it. There are 3 crystalline sentinels and 5 crystalline lookouts (see below) that will attack any intruders, but if the players successfully did not break any of the icicles, the party will be not be spotted by the creatures when they first arrive. These golems once were tasked with overseeing work done here in the mines, but this area has long been stripped and abandoned for greener pastures.
You might allow your players to bypass fighting the crystalline sentinels and lookouts altogether if they have a way to sneak by. If they are defeated though, an examination of the bodies of the crystalline creatures will provide chunks of ore worth 50 gp for each sentinel and 20 gp for each lookout.
A search of the area should also uncover the following:
- A set of crates filled with supplies including a set of climbing gear, a hooded lantern, 5 flasks of oil, and a miscellaneous assortment of picks, shovels, and hammers
- A single healer’s kit with 1d10 charges remaining
- [If did you not sell one in Vale Crossing] Lightning-Catching Bottle (from The Griffon’s Saddlebag)
- A faded note written in Sylvan. It appears to be a note to remember a six digit combination of sorts, but due to the fading only the middle numbers are visible which are 5 – 6.


Gorgenal, the Mummer
Soon after making their way past the golems, the party will come across a chamber with a locked thick iron door that blocks their progress further into the mine.
On the walls of the room, there is a panel with six levers (that can only be moved in the up or down position; they start up by default) labeled with numbers from 1 to 6 and a single button. The players must figure out the correct sequence of levers to pull in order to unlock the door (which is 4-2-5-6-1-3). The button resets all of the levers back to the up position.
As they search the room, there are three main clues to solve the puzzle but you can feel free to add more as needed:
- A DC 12 Investigation check shows a heavy traffic of footprints leading from other areas of the chamber to level #4 and then fading from there, suggesting 4 is the first number. There is a similar pattern from lever 3 to the iron door, demonstrating that it’s the last one.
- The note from the crate in the prior room. If they missed it you can have it be here.
- A strange clicking sound comes from behind the levers when a lever is pulled in the correct order. By trial and error, they should be able to determine the order of levers 2 and 1.
Once past the door, read the following:
The faint sound of a lively tune in the distance echoes through the chamber. The music leads you to a hooded figure, their fingers expertly dancing over the holes of a flute. The man is slender with a sharp nose and dressed in a patchwork of mismatched furs and hides.
As you approach, the figure stops playing and turns to face you all, a mischievous grin on his face. “Well, well, well,” he says, rubbing his hands together. “It seems I have stumbled upon quite a find. And what brings you to these dark, dreary mines, hmm? Treasure? Glory?”
A player with a passive perception of 16 or higher will notice Gorgenal does not cast a shadow. This is because it was severed by Endelyn’s Scissors of Shadow Snipping, though he will not share as much. If the players introduce themselves, the man will do so in kind:
“I am Gorgenal of the Greyhawk Mummers,” he says in a sly voice and with a slight bow. “Perhaps you’ve heard of me?”
As mentioned earlier, as we are not using the Fey Beacons section I am breaking that content into other sections, starting with one of the mummers, Gorgenal, who – unlike the book, is not a peryton.
Gorgenal will share the following information:
- He is a member of the Greyhawk Mummers, a group of actors and pantomimists from the Free City of Greyhawk on the world of Oerth. He serves as the group’s jester, but admits the role has lost its luster
- As per the book, the other members of the troupe are Archillus and Mortia – the leading male and leading female of the group, Verna (Mortia’s bitter understudy), Mauldower (an old-timer who believes his cohorts are amateurs), Angara (the troupe’s matriarchal dame), Carthasar (a method actor), and Thornelia (a minstrel)
- Their group was heading to a show when they lost their way in the woods. When they emerged they found themselves in the Feywild. It wasn’t soon after that they learned of a powerful woman seeking actors – what could be a better opportunity?
- Unfortunately their performance for Endelyn did not go well, and whereas the rest of his troupe were turned into perytons – birds with antlers, Evelyn found Gorgenal amusing and brought him into her service
- Endelyn is obsessed with the theatre and can see visions of the future
- A fierce dragon is said to dwell deeper in the mines – something he’ll make light of despite the danger
- “Just a friendly warning – there’s a dragon in these mines, and I doubt it’ll be thrilled to have visitors. So unless you want to be toasted like a marshmallow, I suggest you be careful!”
Gorgenal will also mix in the following lies. Uncovering his falsehoods requires a successful DC 18 Insight check, and if a character fails a check it will put Gorgenal on guard, causing any future Insight checks to have disadvantage
- Endelyn has tasked him with collecting cold iron from the Brigganocks and he was on his way to their mine when he came across the party. He would be happy to guide them there
- Truth: Evelyn has sent him to the mines to watch over the dragon Zephyrum that nests in the mines. Gorgenal uses the dragon to keep the brigganocks in line as they collect cold iron on her behalf. He has also been ordered to dispose of any outsiders and plans to lead the party into a trap
- He does not know any details about the dragon in the mine – it is just a rumor he heard and he’s given it a wide berth
- Truth: See above
- He will offer to sell potions of Winter’s Ward for 25 gp each or an equivalent trade that he claims provide resistance to cold damage for 1 hour. He describes them as a mixture of snowdrop petals and crushed ore.
- Truth: The potions will instead make the drinker vulnerable to cold damage for 1 hour which could be discerned with the identify spell
If the party accepts his help as a guide, he leads them down a series of twists and turns, dodging and weaving through the mines until they reach:
A narrow stream of water winds through the ground here, shimmering in a spectrum of colors from vibrant teal to deep purple. A statue of carved of ice sits at the end of the stream. The statue depicts a humanoid creature with thick fur covering its body and its hands are elongated into long claws through which the water releases down into the stream like a miniature waterfall.
- The statue depicts a brigganock and you can have a character make a DC 16 Nature or History check to determine if they recognize it. The stream was put here to act as a place of refreshment for brigganock miners when they worked in this area in the past.
- Anyone that drinks directly from the stream must succeed on a DC 12 Constitution saving throw. On a success they gain 10 temporary hit points that last until the character takes a long rest. Otherwise they are poisoned for 1 hour and do not gain the temporary hit points.
As the group follows Gorgenal deeper into the mines, they start to hear the faint, haunting sound that seems to be coming from all around them become louder. He tells them not to worry, saying that it’s just the wind howling through the tunnels and the reason for its namesake. In fact though he is leading them to a trap as per his orders to kill outsiders that might interfere with Endelyn’s efforts in the mines.
The potential exception here is if the party showed any interest in stagecraft and taking part in Endelyn’s plays. In that case he may be inclined to safety lead them out to Brigganock Mine and give directions to Motherhorn.
The Ambush
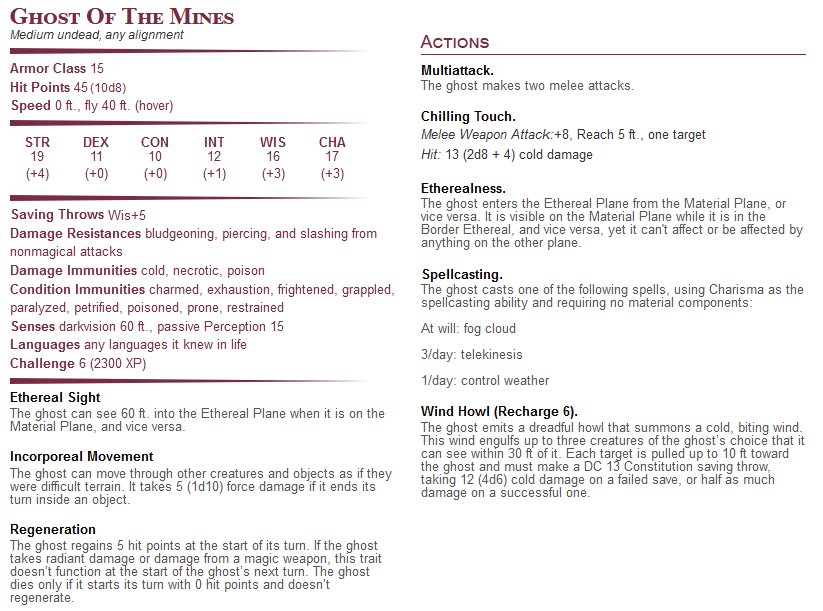
Soon after the path leads into a small chamber of the mines filled with a light fog. The trap consists of a ghost of the mines (see below) and three shadow (variants) that are shadows snipped by Endelyn. While the howling noises of the mines are indeed a natural phenomenon – the increase in volume here is from the ghost. At your discretion one of the shadows could be Gleam’s, which means it’s destruction would lead to the restoration of the imprisoned Gleam’s actual shadow.
As soon as the fighting begins Gorgenal will drink a potion of invisibility and flee, cackling with glee as he leaves. A stat block is provided for Gorgenal further down if you need it.

The Mineshaft
Once out of the ambush on their own, it will take the party a few more hours of travel through the mines until they reach the final chamber.
Light spills through an opening in the rock wall in this large chamber clearly marking the path forward. While a clear exit lays ahead of you, there is also a large, vertical platform that sits in the back of the room with an intricate control panel set into it.
The platform is a steam powered elevator that leads down to a lower level of the mines where the dragon Zephyrum nests.
- The panel has a key slot, a dial, and two buttons (arrow up, arrow down)
- The dial controls the speed, while the arrows send the platform lift up and down
- The panel is inactive without the key
When the key is entered (which can be found in Brigganock Mine later) the panel will shudder, releasing a puff of steam as it activates. You may also allow a successful DC 22 Dexterity check using thieves’ tools to activate it, but if your party is injured you may want to disallow it as the dragon lurking in the depths may mean death.
The exit meanwhile leads directly to Brigganock Mine, which is most likely course of the action here.
Zephyrum’s Lair
If the party takes the elevator from the mine shaft down, they are brought into a lower level of the mines.
As you make your way in, you come across a small alcove that has been converted into a living area of sorts. A bedroll has been laid out on the ground next to a small fire pit and an assortment of basic supplies.
This is Gorgenal’s home for the nights where he is keeping watch over the mine and Zephyrum. As the party examines the area, eight winged beasts with antlers will circle and wheel around them, before landing and watching them quizzically. If the players learned of the perytons from Gorgenal and aren’t putting two and two together that these are his old troupe, allow a DC 12 History check to connect the dots on their behalf.
If the party has a spell such as speak with animals they can learn of the peryton’s plight, and that they have stayed near their old partner Gorgenal out of boredom. If not, consider placing a scroll of the spell among Gorgenal’s belongings – he may need to speak with them on occasion after all. The perytons will also share that:
- The perytons were once a troupe of actors called the Greyhawk Mummers. Endelyn invited them to Motherhorn, where they performed pantomimes. When their popularity made them haughty and difficult to control, Endelyn locked them up. When they begged to be set free, the hag honored their request by releasing them into the wild—but only after she turned them into perytons. The transformation deprived them of speech, yet they retain their theatrical behavior and long for a performance or the opportunity to perform
- Endelyn has enrolled a quite promising actress who goes by Charmay who has seemingly replaced them in Endelyn’s affections
- If the party shares any of the lies from Gorgenal, they will provide the truth of those answers
As in the book, the characters can ask the perytons to perform one of their favorite pantomimes. The perytons are taken aback, in a good way, by the request and appreciate the opportunity to entertain a crowd. They perform a pantomime show, then take their bows silently. If everyone in the party claps or cheers, the perytons are thrilled. If one or more party members fail to clap or cheer after the perytons perform, the perytons become furious and may warn Zephyrum and Gorgenal of the party’s arrival.
Similarly, the characters can also impress the perytons by putting on a performance of their own. Impressing the perytons requires the performing characters to succeed on a DC 15 Charisma (Performance) group check. Any character who received an acting lesson from Candlefoot in the Witchlight Carnival has advantage on this check. If the group check succeeds, the perytons regard the characters as kindred spirits.
In the case of a good show (by the mummers or the party), the perytons will warn them of the dragon and Gorgenal being further ahead. As a part of this they will share the dragon’s resistances and immunities and its main abilities (tunneler, spider climb, debilitating breath, hold person).
Zephyrum
After a short trek past the camp site read the following (though if the group was warned by the mummers and is being sneaky, you may choose to exclude the last sentence):
As you venture deeper, you are suddenly confronted by a massive, fearsome creature that bursts out from the rock wall with a fierce roar. Its scales are a deep, iridescent blue that shimmer and sparkle in the dim light of the mines, creating an almost mesmerizing display of color. Despite its beauty, there is no mistaking the raw, primal energy of a deadly predator that radiates from the creature’s piercing gaze. Its muscles are coiled, and you can feel the cool wind of its breath on your skin as it snarls and prepares to strike.
If Gorgenal is alive, he will also be here watching over the dragon. They will both attack the party on sight. Gorgenal uses the bard (MotM) stat block (but with a Charisma of 18, spell save DC of 16, and double the hit points), while Zephyrum is a young sapphire dragon (Fizban’s Treasury of Dragons), though a young blue dragon (Basic Rules; but substitute it’s lightning breath for the cold breath from a young white dragon) can work as a substitute.
If they are defeated, the players can loot Zephyrum’s hoard which contains:
- 4,200 (12d6 × 100) cp
- 2,100 (6d6 × 100) sp
- 280 (8d6 × 10) gp
- An enhanced Wand of Magic Missiles where each magic missile dart deals 2d4+2 damage instead
- 2d4 Feywild trinkets
- 4 Ingots of Cold Iron

Cold Iron
Cold iron ingots can be used to craft a cold iron weapon. Recommended locations include the Woodcutter’s Axe in Vale Crossing, Arctis Tor, and once the party travels back to their home city after Yon (Waterdeep for my campaign). You may choose to allow it to happen by other means – especially if you have a character well versed in smithing. It takes two ingots to enhance an existing weapon (similar to silvering a weapon), or you may choose to allow a new weapon to be made with other ingredients mixed in.
Cold iron weapons have the following properties:
- You gain a +1 bonus to attack and damage rolls made with this magic weapon
- When hitting a creature of the Fey creature type with a cold iron weapon:
- The weapon’s damage bypasses any resistance or immunities to Bludgeoning, Piercing, and Slashing damage
- The attack deals an extra 1d10 damage of the weapon’s type
Brigganock Mine
Once out of The Howling Mines (see the mineshaft section above), the party will soon find the entrance to the Brigganock Mine (the two are connected), and should hear the tapping, etc. from the book. Things should play out as written until the confrontation with Molliver and the brigganocks where we will need to change what is told to the party.
When speaking with Molliver he will instead share the following information and will similarly order the release of any captured characters if convinced appropriately. If the party helped Elkhorn and Strongheart earlier in The Fields of Spring, they can use that to their advantage to win over Molliver.
- He is a member of Valor’s Call who was separated from his party after a confrontation with the League of Malevolence. The brigganocks found him and nursed him back to health.
- Unlike Strongheart and Elkhorn, his memory is slightly less damaged than his two partners. He can remember the appearances and names of each of the members of the League of Malevolence and is happy to share them.
- He will also mention a powerful sorceress who appeared in the middle of the battle and turned the tide against them. This was Tasha disguised as Zybilna but he doesn’t know her name and can only provide her description (you can use the handout of Zybilna from Part XV when describing her)
- He won’t be willing to leave the brigganocks to meet up with Strongheart and Elkhorn though unless he knows the brigganocks are safe from either the korreds or the dragon Zephyrum
- The brigganock’s home is called Wish-Come-True, which is hidden here deep beneath the mountains. Its buildings are adorned with glittering gems made from cut the mines. Hidden behind thick rock walls and powerful illusions, it can never be found by outsiders, nor can it be scried upon using divination magic.
- The brigganocks are happy to have Molliver as their spokesperson and chief advisor when it comes to dealing with outsiders.
- Note: I just replaced the brigganock home/grotto with Wish-Come-True. It didn’t really make sense to have a separate city that doesn’t show at all in the campaign
- If the party is looking to get to the palace they should meet with Obud in the Mining Lodge (Obud’s Grotto) on the outskirts of Wish-Come-True. Obud is the keeper of the secret path to Motherhorn, which is on the way to Arctis Tor. Obud is the oldest brigganock here and thus in charge – he handles the appraising and inspection of gemstones
Heading to Obud’s Grotto
Once pleasantries are done, Molliver and the brigganocks will lead the group back towards Wish-Come-True to meet with Obud. During the trek, Molliver will share the additional tidbits:
- He introduces the brigganocks near him as Trig, Zarli, Oyla, and Ajak. The mines are their livelihood. It would be a violation of the rules of ownership to take gems from the mine walls
- The brigganocks work their mine at all hours because they know the noise aggravates the korreds and also because Lyn forces them to provide her with a cut of their mining yield. A man named Gorgenal comes regularly to collect
- Creeping Lyn kidnapped the brigganocks’ best architect, Golmo, who now toils in Arctis Tor, the Winter Palace, designing new contraptions for her (note: not Motherhorn!)
- The korreds provide Creeping Lyn with locks of their magic hair, which she uses to build her contraptions (this of course is partially false. She cuts the korreds’ hair without their consent; they are not her allies, but he doesn’t know this)
During this trip, I recommend having the Pageant Wagon random event take place, traveling in the opposite direction. The brigganocks ignore the wagon who comes by often and apparently travels all across Yon – also none of them are interested in acting. For the scene I might recommend the fight with the yeti as a good option. Instead of a ticket though, I would have the figure hand out leaflets similar to the ones found in Vale Crossing:
- Casting Call
- Seeking actors and actresses of all races and ages. Come audition at Motherhorn, the grand amphitheater of Yon and make a name for yourself across the Feywild
- This is an unpaid opportunity
In the book the party needs to traverse Rivenwish Chasm to reach the grotto. I would instead just have the party be led directly there. Instead you can have the chasm be an obstacle on the player’s path out of the mines and back out to the other side of the Shimmerstorm Mountains. If you do choose to use it I recommend this edit by u/lebiro.
Once at the grotto things will play out mostly the same except:
- In addition to the gems laid out in front of him, there should also be one cold iron ingot there as well (worth 200 gp)
- Rather than sweets and the like I had Obud ask the party to defeat the dragon Zephyrum in mines in exchange for the secret tunnel. The dragon is used by Gorgenal to force them to work for Creeping Lyn. He can provide the key to the mineshaft elevator
- He should also explain the concept of wish stones and perhaps even show one as an example. One thing I changed is that if you touch a wish stone for the first time you can visualize the wish. For the example I used a tidbit from this supplement:
- “You see huge stage with an enormous crowd watching eagerly. On the stage is a lone bugbear (Hurly), who is expected to deliver a pleasing performance to the packed crowd, who seem impossible to please. Hurly is visibly struggling with his lines and wishes to be free .”

Tunnel to Motherhorn
Once the party has defeated Zephyrum (or otherwise convinced Obud), he will lead the party to a permanent illusion in the basement wall of the lodge. This secret tunnel leads out of the mines and back out to the Shimmerstorm Mountains near Motherhorn. As an additional reward I had Obud allow each party member to take a stab at mining. Each player should roll a D12 and receive the reward below (based on tool proficiencies you may allow a +1 or +2 to the roll):
- 1 – 3: Obsidian (opaque black) stone worth 10 gp
- 4 – 5: Onyx (opaque bands of black and white) worth 25 gp
- 6 – 7: Jasper (opaque blue) worth 50 gp
- 8 – 9: Garnet (transparent brown-green) stone worth 100 gp
- 10 – 11: Cold Iron equal to one ingot
- 12+: Cold Iron equal to two ingots
In the book this tunnel leads to M12 in Motherhorn. This is obviously no longer the case. I feel like it’s fine to have the party always enter Motherhorn through the main entrance, but if you’d like to give the party the option then you can have Obud give them directions about a secret entrance outside of Motherhorn that they can use to get to M12.
A final note. The book suggests that if the korreds and brigganocks are allied an assault could be made on Motherhorn. This is less in line with the concepts we’re going for (plus the play is a ton of fun) so I might avoid this altogether. An alternative for team up action could be them all helping the party to defeat Zephyrum and Gorgenal and thus free the mountains of the hag’s influence.
Resources
I have highlighted some of the resources I used for this portion of the campaign below.
Art
- Location Handouts | Painting Yon series by tzlynart
- Others all included in the article itself!
Music
- Yon Background Music
- Traveling the Tundra by MAB Music TTRPG
- Lost Spire of Netheril by MAB Music TTRPG
- Location Specific Music
- Shimmerstorm Mountains | “Fey Beacons” by Delver’s Symphony
- Lockbury Henge | “Fire Temple” from Ocarina of Time by Noble Dragon
- The Howling Mines | “Ice Cave Ambience” by MAB Music TTRPG
- Zephyrum’s Lair | “Lysan’s Lair” from Icewind Dale
- Brigganock Mine | “The Whale’s Trust” by Travis Savoie
- Combat Music
- Fighting the Golems | “Drums of the Dead” from Icewind Dale
- The Ambush | “Metal Gleamed in the Twilight” from Child of Light
—
What’s Next?
After coming out of the mines to the other side of the Shimmerstorm Mountains, our party will find themselves at the doorstep of Motherhorn, the amphitheater of horrors. As always, please don’t hesitate to reach out with any comments, questions, or suggestions and… see you in the Feywild!

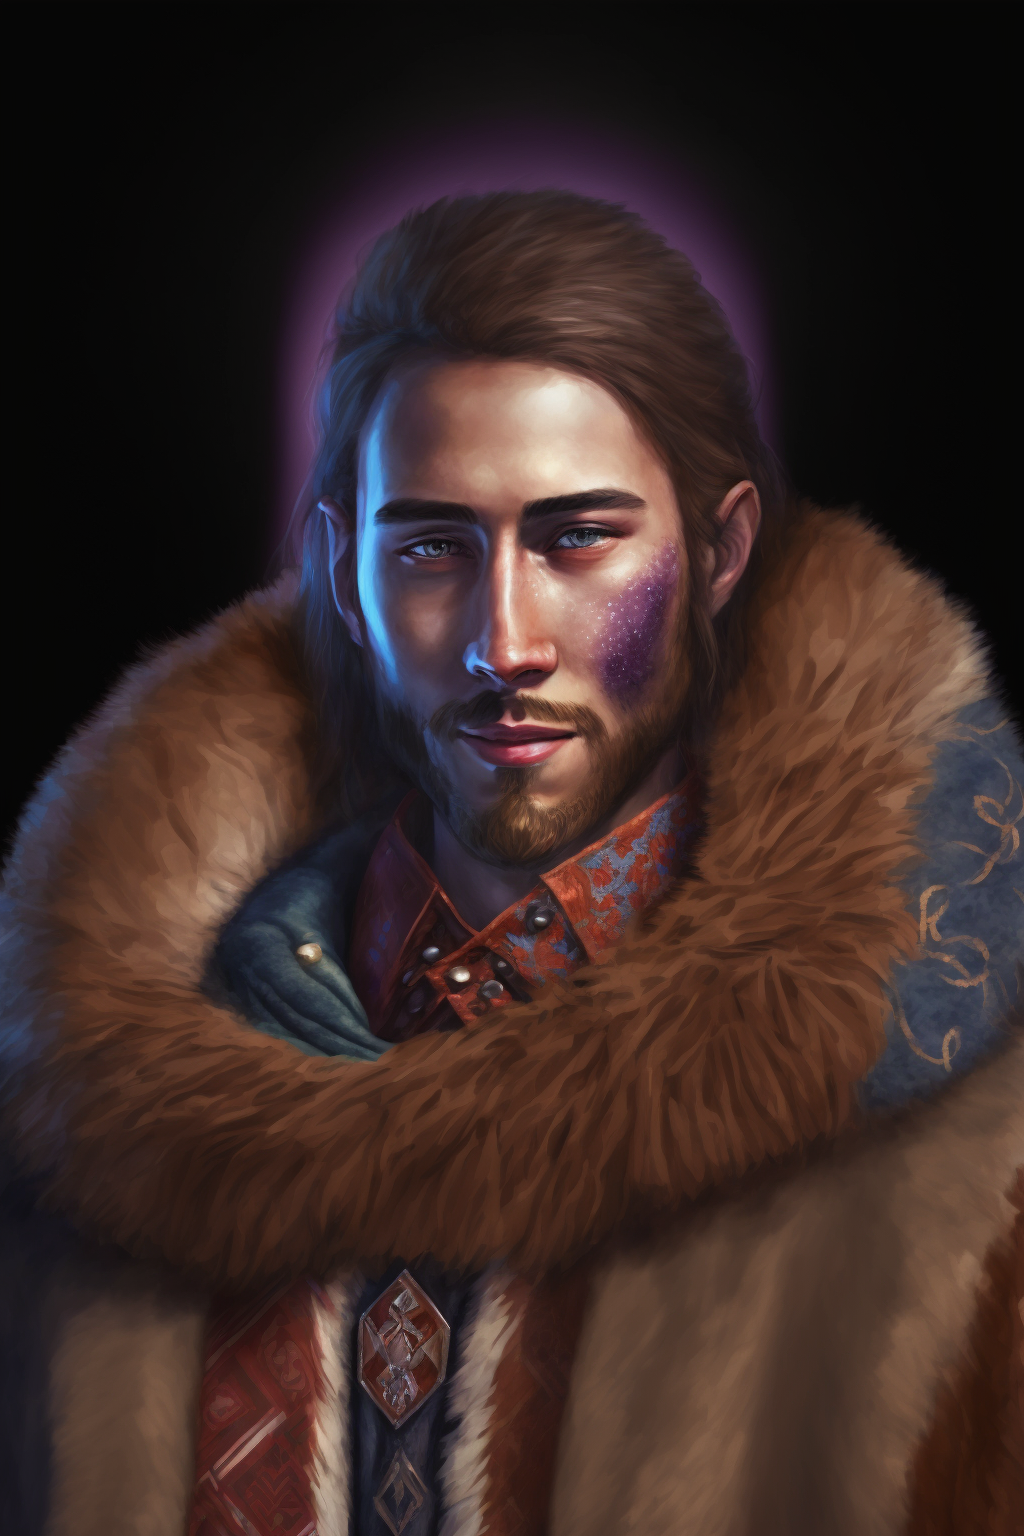
Hi!
This is my Queen Argantle. Added more like stone structure to her skin
https://drive.google.com/file/d/1ywL9qra98npDd8Arh_wGiAeACuPs7RnW/view?usp=drive_link